Follow the tutorial of official website and do a Demo on Github
Django at a glance
Here are summaries of what Django is better.
Design the model
The ORM(Object-relational mapper) can make user describe the database layout in Python code.
Dynamic admin interface
Django can automatically create a professional, production ready administrative interface.
So managing the whole system is very easy with Django.
Design your URLs
By using Python module called URLconf, can design simple mapping between URL patterns and Python callback functions. It can also decouple URLs from Python code.
Write your views
View is responsible for doing 2 kind of things: one is returning HttpResponse object containing the content fir the requested page, one is raising exception such as Http404.
Design your templates
Django has a template search path, which can minimize redundancy among templates.
Create a virtual environment
So the virtual environment can let different users use different environments in Django. Each project will differ from each other.
Writing your first Django app, part 1
Where should the code live?
It’s not a good idea to put any Python code in the Web server’s document root because it risks the possibility that people may be able to view the code on Web.
The right way is to put the code in dictionary outside the document root.
Each part of startproject meaning
The structure is like this one:
mysite/
    manage.py
    mysite/
        __init__.py
        settings.py
        urls.py
        wsgi.py
Here are meanings of each part:
- The outer mysite/ root: Just a directory of the project. The name can be anything you want and doesn’t effect Django project.
- manage.py: A command-line utility which lets people interact with Django in various ways. So in my own understanding, it means that the control and management part.
- The inner mysite/ directory is the actual Python package for the project. Name is package name and need to use to import anything inside it. Such as mysite.urls
mysite/__init__.py: Empty file tell Python that the directory should be considered as a Python package.mysite/settings.py: Settings for Django project.mysite/urls.py: I think it is a router list for the whole project.mysite/wsgi.py: A WSGI(Python Web Servere Gateway Interface) -compatible web servers to serve the project. Like you can define the response for some requests.
Start the server
Start server is very easy in Django. After all settings, we can just start it by:
python manage.py runserver
And default port is 8000.
If we want to change the port number, we can change the command with parameter and it will be :
$ python manage.py runserver 8080
The example will change port to 8080.
If we want to change the port with IP address,such as we want to listen all available public IPs in the part, we can just pass the IP with the port number. Like:
$ python manage.py runserver 0:8000
0 in the above command is abbr. for 0.0.0.0,So the full format for this part is
$ python manage.py runserver 0.0.0.0:8000
Tips:
Each request of the Web for Django, the server will automatically reload all Python code, so in mainly situations we don’t need to restart the server if we change some code. But there are really some situations for the Django server to restart, such as adding files, also need to restart the server then it takes effect.
Creating the Polls app
In Django ,I think it is “Convention Over Configuration” , and in official documentation it said:
Each application in Django consists of a Python package that follows a certain convention. Django will generates basic directory structure for an app.
In the official guide, it suggests create directory polls which in the same level with manage.py.The directory of Polls is like this:
polls/
    __init__.py
    admin.py
    apps.py
    migrations/
        __init__.py
    models.py
    tests.py
    views.py
In this part, the include() function allows one project referencing other URLconfs, whenever Django encounters include(), it just go to the matched URL’s component and send the remaining string to the included URLconf for further processing. So the first step is to match part of code to some URLconfs, and then send the remaining part to the selected URLconf then let it process.
In mysite/urls.py, we define the patterns for the whole project. then after configure things in mysite/urls.py, we can test through visiting http://localhost:8000/polls/ and should see the thing we put in polls/views.py.
The url() function is passed four arguments: two must have(regex and view), and 2 optional(kwargs and name). Here are what these functions for and how to use them.
url() argument: regex(regular expression)
Regex, as mentioned in the title, is the abbr. of Regular expression.
Django starts at the first Regex and compare the requested URL until it finds one that matches.
url() argument: view
After capturing the regex, Django will return one specific view for the one Regex that matches.
url() argument:kwargs(keyword arguments)
Arbitrary keyword arguments can be passed in a dictionary to the target view. In this tutorial we are not going to use it.
url() argument:name
Name url so url can be refered clearly from elsewhere in Django. This function is very useful for templates.
Writing your first Django app, part 2
In this part, we will
- setup database
- create the first model
- get a quick introduction to Django’s automatically-generated admin site.
Database setup
Default database for Django project is SQLite. Settings of database is in mysite/settings.py.
Default settings in the project is below:
DATABASES = {
    'default': {
        'ENGINE': 'django.db.backends.sqlite3',
        'NAME': os.path.join(BASE_DIR, 'db.sqlite3'),
    }
}
If want to change, just change these settings in settings.py and here are some options we can choose from:
ENGINE– Either'django.db.backends.sqlite3','django.db.backends.postgresql','django.db.backends.mysql', or'django.db.backends.oracle'. Other backends are also available.NAME– The name of your database. If you’re using SQLite, the database will be a file on your computer; in that case,NAMEshould be the full absolute path, including filename, of that file. The default value,os.path.join(BASE_DIR,'db.sqlite3'), will store the file in your project directory.
Also we need to add additional settings like USER,PASSWORD and HOST to connect the database.
While you’re editing mysite/settings.py, set TIME_ZONE to your time zone.
INSTALLED_APPS is a module that at the top of file. Apps in my understanding, is like modules in Spring. It is one already built part of code and can be activated to provide a specific, independent function for whole project.
by default, INSTALLED_APPS contains the following apps, and all come with Django:
django.contrib.admin– The admin site. You’ll use it shortly.django.contrib.auth– An authentication system.django.contrib.contenttypes– A framework for content types.django.contrib.sessions– A session framework.django.contrib.messages– A messaging framework.django.contrib.staticfiles– A framework for managing static files.
In this part, SQLite doesn’t have things for our already INSTALLED_APPS, so we need to tell Django to create them. Here is command for creating the databases for our project:
$ python manage.py migrate
This command looks at INSTALLED_APPS setting and creates necessary database tables according to database settings in mysite/settings.py.
In Pycharm it is very easy to see things in Database. It has one sidebar option for it and just click you will see it.
Creating models
We will create 2 models:Question and Choice. And Choice is related with Question.
Model has some attributes:
- A number of class variables, represents a database field in the model.
- Each field is represented by an instance of
Fieldclass, which tells Django the type for data each field holds. - Name of each
Fieldinstance is the field’s name,in machine_friendly format. Use this in Python code, and database will also use it as the column name. - Some
Fieldclasses have required arguments.CharFieldrequires give it amax_length.This will also be in validation. - Some
Fieldalso can have various optional arguments. - Django supports all the common database relationships: many-to-one, many- to-many,and one-to-one.
Each time changing the fields, need to run the command:
$ python manage.py makemigrations polls
To tell Django you have already make some changes in database and want Django to refresh it.
Activating models
After migration, if we want to see the corresponding command of SQL, we can just use command below:
$ python manage.py sqlmigrate polls 0001
In this part, polls means the component we create, and 0001 is the index of migration. In this tutorial, here is the output:
BEGIN;
--
-- Create model Choice
--
CREATE TABLE "polls_choice" (
    "id" serial NOT NULL PRIMARY KEY,
    "choice_text" varchar(200) NOT NULL,
    "votes" integer NOT NULL
);
--
-- Create model Question
--
CREATE TABLE "polls_question" (
    "id" serial NOT NULL PRIMARY KEY,
    "question_text" varchar(200) NOT NULL,
    "pub_date" timestamp with time zone NOT NULL
);
--
-- Add field question to choice
--
ALTER TABLE "polls_choice" ADD COLUMN "question_id" integer NOT NULL;
ALTER TABLE "polls_choice" ALTER COLUMN "question_id" DROP DEFAULT;
CREATE INDEX "polls_choice_7aa0f6ee" ON "polls_choice" ("question_id");
ALTER TABLE "polls_choice"
  ADD CONSTRAINT "polls_choice_question_id_246c99a640fbbd72_fk_polls_question_id"
    FOREIGN KEY ("question_id")
    REFERENCES "polls_question" ("id")
    DEFERRABLE INITIALLY DEFERRED;

COMMIT;
So till now there are 3 steps to make model changes in Django:
- Change models(in
models.py) - Run
python manage.py makemigrationsto create migrations for those changes - Run
python manage.py migrateto apply those changes to the database.
And in the tutorial it said the meaning of making and applying migrations are separated is because the 2nd step is to produce the file for Version controls for others in your team and they can also run the script to change their model.
Playing with API
First we have to go in database API:
` from polls.models import Choice, Question`
We also can define something in the model to show it when we want to see the things contains in model:
from django.db import models

class Question(models.Model):
    # ...
    def __str__(self):
        return self.question_text

class Choice(models.Model):
    # ...
    def __str__(self):
        return self.choice_text
So the command above defines that it will return the question_text and choice_txt when we want to show them.
Also in the Admin page, Objects will be shown by the __str__
These APIs for relationships of data can be separated by double underlines: __
Introducing the Django Admin
So Django can generate the Admin site automatically.
All we need is in the command line writing the username and password, then we can just go http://127.0.0.1:8000/admin/ and login we will see it.
Writing your first Django app, part 3
This part is mainly about the view in Django.
In the polls/urls.py, the urlpatterns exists of three elements:
- url analysis
- method in
views.py - url name
Even a lot of situations you need is only write the code and refresh it in Browser, but in my machine, I have to restart the Django app to make the url part refresh so it can work.
Why it is a bad idea to put everything without a
polls/templates?Django will choose the first template it find whose name matches, and if we have a template with the same name in different application, Django will not be able to find the difference between them.
Namespacing URL names
In tutorial we only have one app, but in real projects there are a lot of different apps. So Django differentiate the URL names between them is to add a namespace for every separated part of url.py file and use this pattern to separate them.
After adding the app_name, polls/urls.py will be like:
from django.urls import path

from . import views

app_name = 'polls'
urlpatterns = [
    path('', views.index, name='index'),
    path('<int:question_id>/', views.detail, name='detail'),
    path('<int:question_id>/results/', views.results, name='results'),
    path('<int:question_id>/vote/', views.vote, name='vote'),
]
If we want to use the namespacing, besides changing the part of polls/urls.py,also need to change things in mysite\urls.py. Here are changes:
urlpatterns = [
    path('admin/', admin.site.urls),
    url(r'^polls/',include('polls.urls',namespace="polls")),
]
Add the namespace part in the file.
Writing your first Django app, part 4
write a simple form
File polls/templates/polls/detail.html is changed to:
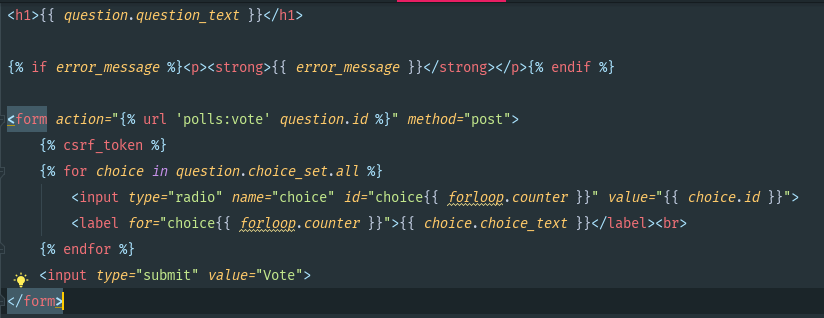
And here is the explanation of the mainly points:
-
The template displays a radio button(But in my browser it is a button) for each question choice. The value is associated with question’s choice’s ID. And name of it is
choice.So after clicking the button, the page send one POST data
choice=#where # is the ID of the selected choice. -
In the part of action, the
methon="post"is to make sure the method of Http request. -
forloop.encounteris the counter of how many times the loop run -
csrf_tokenis a abbr. of Cross Site Request Forgeries
And then here is the changes of vote in views.py
from django.http import HttpResponse, HttpResponseRedirect
from django.shortcuts import get_object_or_404, render
from django.urls import reverse

from .models import Choice, Question
# ...
def vote(request, question_id):
    question = get_object_or_404(Question, pk=question_id)
    try:
        selected_choice = question.choice_set.get(pk=request.POST['choice'])
    except (KeyError, Choice.DoesNotExist):
        # Redisplay the question voting form.
        return render(request, 'polls/detail.html', {
            'question': question,
            'error_message': "You didn't select a choice.",
        })
    else:
        selected_choice.votes += 1
        selected_choice.save()
        # Always return an HttpResponseRedirect after successfully dealing
        # with POST data. This prevents data from being posted twice if a
        # user hits the Back button.
        return HttpResponseRedirect(reverse('polls:results', args=(question.id)))
request.POSTset the method for data by key name.- After the counter+1, the code runs
HttpResponseRedirectwhich takes a single argument. reverse()function in theHttpResponseRedirectcan help to avoid hardcode URL. It will find the URL which matches in thepolls/urls.py, and then call it. It will fill the blank with the parameter which is given.
Amend views
In this part, we use the generic view instead of the views created by ourselves.
The DetailView need primary key value, which captured from the URL to be called “pk”.So we change it from the question_id to pk for the generic views.
And all the functions has their own default name of page, such as <appname>/<model name>_detail.html for DetailView. So if we want to use our own view instead, we have to figure out which one matches which one. Like this:
class DetailView(generic.DetailView):
    model = Question
    template_name = 'polls/detail.html'
Writing your first Django app, part 5
This part is mainly for how to do automatically testing.
Here is the steps for automatically testing to be done:
manage.py test pollslooked for tests in thepollsapplication- it found a subclass of the
django.test.TestCaseclass - it created a special database for the purpose of testing
- it looked for test methods - ones whose names begin with
test - in
test_was_published_recently_with_future_questionit created aQuestioninstance whosepub_datefield is 30 days in the future - … and using the
assertIs()method, it discovered that itswas_published_recently()returnsTrue, though we wanted it to returnFalse