1. Refactor code: import Exception and retest
Last article we said that the way only use try catch is not user-friendly. So toady we put them together and build a hierarchy tree like this:
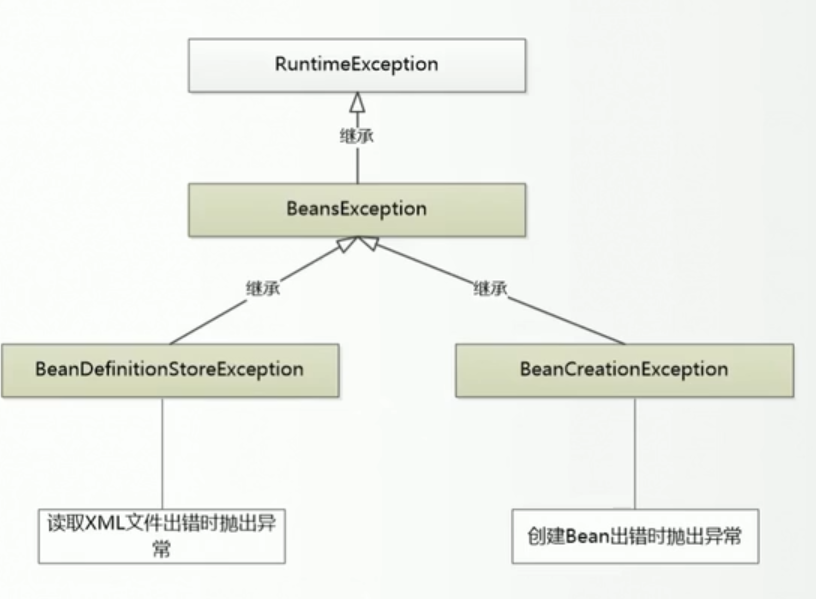
To test this tree, I change the XML file to this one:
<?xml version="1.0" encoding="UTF-8"?>
<beans xmlns="http://www.springframework.org/schema/beans"
       xmlns:xsi="http://www.w3.org/2001/XMLSchema-instance"
       xsi:schemaLocation="http://www.springframework.org/schema/beans
           http://www.springframework.org/schema/beans/spring-beans.xsd">

  <bean id="petStore"
        class="org.litespring.service.v1.PetStoreService" >
  </bean>
 <bean id="invalidBean"
        class="xxx.xxxxx" >
  </bean>
</beans>
Can see I add an invalidBean, which is not a standard format of class name.
BeanCreationException
Method getBean after refactor is this format:
	public Object getBean(String beanID) {
		BeanDefinition bd = this.getBeanDefinition(beanID);
		if(bd == null){
			throw new BeanCreationException("Bean Definition does not exist");
		}
		ClassLoader cl = ClassUtils.getDefaultClassLoader();
		String beanClassName = bd.getBeanClassName();
		try {
			Class<?> clz = cl.loadClass(beanClassName);
			return clz.newInstance();
		} catch (Exception e) {
			throw new BeanCreationException("create bean for "+ beanClassName +" failed",e);
		}
	}
Can see here if the BeanDefination is null, we throw BeanCreationException. Here the Exception is from classLoader, when we use the ClassLoader to generate the class with xxx.xxxxx, it will throw an java.lang.ClassNotFoundException: xxx.xxxxx,so from here we throw a BeanCreationException, then we meet our need.
public Object getBean(String beanID) {
		BeanDefinition bd = this.getBeanDefinition(beanID);
		if(bd == null){
			throw new BeanCreationException("Bean Definition does not exist");
		}
		ClassLoader cl = ClassUtils.getDefaultClassLoader();
		String beanClassName = bd.getBeanClassName();
		try {
			Class<?> clz = cl.loadClass(beanClassName);//Here will throw ClassNotFoundException
			return clz.newInstance();
		} catch (Exception e) {
			throw new BeanCreationException("create bean for "+ beanClassName +" failed",e);
		}
	}
BeanDefinitionStoreException
	private void loadBeanDefinition(String configFile) {
		InputStream is = null;
		try{
			ClassLoader cl = ClassUtils.getDefaultClassLoader();
			is = cl.getResourceAsStream(configFile);

			SAXReader reader = new SAXReader();
			Document doc = reader.read(is);

			Element root = doc.getRootElement(); //<beans>
			Iterator<Element> iter = root.elementIterator();
			while(iter.hasNext()){
				Element ele = (Element)iter.next();
				String id = ele.attributeValue(ID_ATTRIBUTE);
				String beanClassName = ele.attributeValue(CLASS_ATTRIBUTE);
				BeanDefinition bd = new GenericBeanDefinition(id,beanClassName);
				this.beanDefinitionMap.put(id, bd);
			}
		} catch (DocumentException e) {
			throw new BeanDefinitionStoreException("IOException parsing XML document from " + configFile,e);// Here will throw BeanDefinitionStoreException

		}finally{
			if(is != null){
				try {
					is.close();
				} catch (IOException e) {
					e.printStackTrace();
				}
			}
		}


	}
2. Refactor to meet Single Responsibility Principle for XML file processing
Single Responsibility Principle: For one class. there should be only one reason to trigger it change.
Previously, the part of XML file processing is in DefaultBeanFactory, this class has all functions like read XML file, produce BeanFactory and BeanDefination,generate Bean from BeanDefination by classLoader and BeanFactory. Now we want to extract the first part of functions out.
Then we need to write a class that can pass XML file in and give BeanDefination out. At first impression, we may thinking about designing relationships like this one:
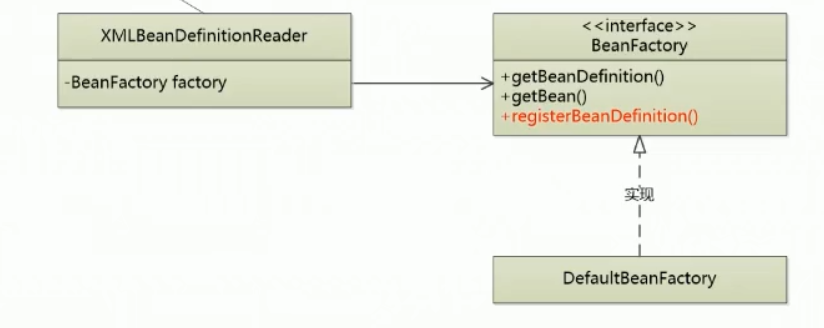
But in this way, there are some problems:
We all know that the class of BeanDefination is our inner class, so we don’t want others to change, such as registerBeanDefination. The BeanFactory is an interface exposed to other developers, so this is not a good way.
How to change?
We can change like this:

I can produce another interface called BeanDefinationRegistry, it has methods for getBeanDefination() and registerBeanDefination(). So that if we only expose BeanFactory to others, it will make no influence to our BeanDefination. Then we let DefaultBeanFactory to implement 2 interfaces to make it work.
This kind of design also meets another principle, which is “minimum interface”.
3. Create ApplicationContext and ClassPathXmlApplicationContext
When I use Spring, I randomly will use BeanFactory and XmlBeanDefinitionReader, why? Because Spring already package them into ApplicationContext. When I need them, I just go here and I can get them. So here I also make a class to meet the requirement.
public interface ApplicationContext extends BeanFactory{

}
public class ClassPathXmlApplicationContext implements ApplicationContext {

	private DefaultBeanFactory factory = null;

	public ClassPathXmlApplicationContext(String configFile){
		factory = new DefaultBeanFactory();
		XmlBeanDefinitionReader reader = new XmlBeanDefinitionReader(factory);
		reader.loadBeanDefinitions(configFile);
	}

	public Object getBean(String beanID) {

		return factory.getBean(beanID);
	}

}
ApplicationContext is an interface, and ClassPathXmlApplicationContext is our class to implement this interface. Can see from here that ClassPathXmlApplicationContext is “ read XML files from that classpath to form an ApplicationContext”.
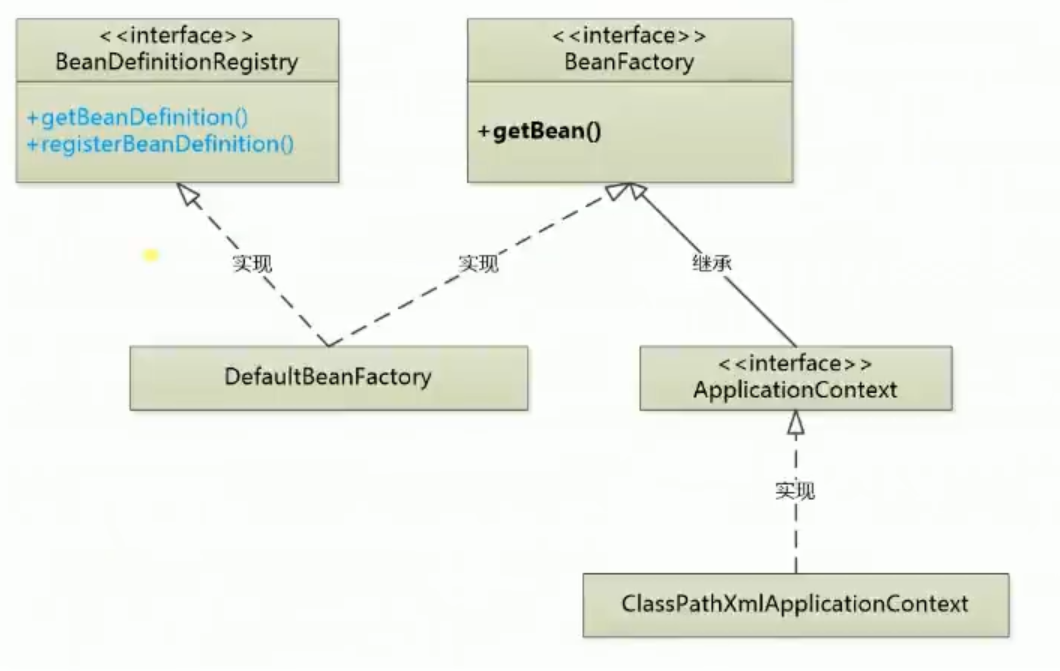
As I mentioned before, ApplicationContext should achieve functions of XMLReader and BeanFactory, so design is like above.
Here is the code of ClassPathXmlApplicationContext
package org.litespring.context.support;

import org.litespring.beans.factory.support.DefaultBeanFactory;
import org.litespring.beans.factory.xml.XmlBeanDefinitionReader;
import org.litespring.context.ApplicationContext;

public class ClassPathXmlApplicationContext implements ApplicationContext {

	private DefaultBeanFactory factory = null;

	public ClassPathXmlApplicationContext(String configFile){
		factory = new DefaultBeanFactory();
		XmlBeanDefinitionReader reader = new XmlBeanDefinitionReader(factory);
		reader.loadBeanDefinitions(configFile);
	}

	public Object getBean(String beanID) {
		return factory.getBean(beanID);
	}

}
In the constructor, we will give it the DefaultBeanFactory, after pass the factory into XmlBeanDefinitionReader , in the reader it will read the configuration file, then put all elements into the “id-class” map.
Notice: now the constructor of
ClassPathXmlApplicationContextjust have a “id-class” map, now we don’t have the Bean yet. We need to rungetBeanto get it.
Now I finished ClassPathXmlApplicationContext, is there any other type of context? Answer is yes. But other ApplicationContext are very similar to this one. They all achieve the functions of generate class from XML files, only difference is the place they from is different. Some from ClassPath, some from FileSystem. Could I integrate them? Yes.
Create one Interface called Resource:
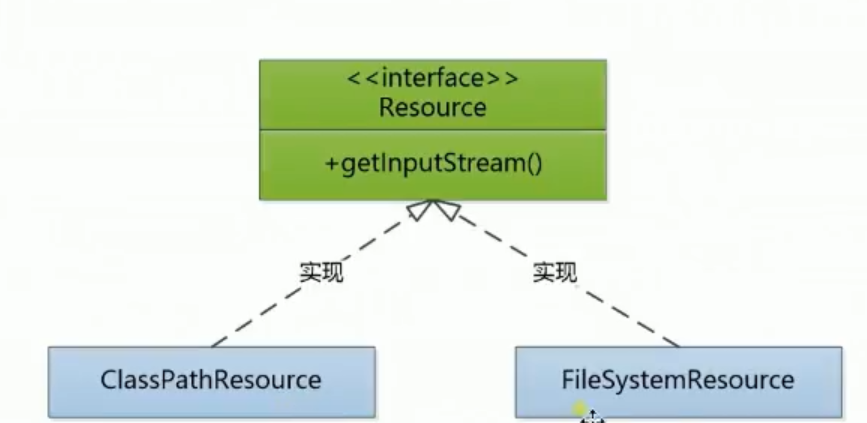
First, we write a Resource interface :
package org.litespring.core.io;

import java.io.IOException;
import java.io.InputStream;

public interface Resource {
	public InputStream getInputStream() throws IOException;
	public String getDescription();
}
Look here we have another method called getDescription(). This is an added method to get description of the resource.
Then we write another two classes: ClassPathResource and FileSystemResource
ClassPathResource
package org.litespring.core.io;

import java.io.FileNotFoundException;
import java.io.IOException;
import java.io.InputStream;

import org.litespring.util.ClassUtils;

public class ClassPathResource implements Resource {

	private String path;
	private ClassLoader classLoader;

	public ClassPathResource(String path) {
		this(path, (ClassLoader) null);
	}
	public ClassPathResource(String path, ClassLoader classLoader) {
		this.path = path;
		this.classLoader = (classLoader != null ? classLoader : ClassUtils.getDefaultClassLoader());
	}

	public InputStream getInputStream() throws IOException {
		InputStream is = this.classLoader.getResourceAsStream(this.path);

		if (is == null) {
			throw new FileNotFoundException(path + " cannot be opened");
		}
		return is;

	}
	public String getDescription(){
		return this.path;
	}

}
FileSystemResource
package org.litespring.core.io;

import java.io.File;
import java.io.FileInputStream;
import java.io.IOException;
import java.io.InputStream;

import org.litespring.util.Assert;


public class FileSystemResource implements Resource {

	private final String path;
	private final File file;


	public FileSystemResource(String path) {
		Assert.notNull(path, "Path must not be null"); //Notice here has an Assert
		this.file = new File(path);
		this.path = path;
	}

	public InputStream getInputStream() throws IOException {
		return new FileInputStream(this.file);
	}

	public String getDescription() {
		return "file [" + this.file.getAbsolutePath() + "]";
	}

}
Look that in FileSystemResource there is Assert. This isn’t the one in JUnit. It is very easy to achieve ,so below we provide this tool class:
package org.litespring.util;

public abstract class Assert {
	public static void notNull(Object object, String message) {
		if (object == null) {
			throw new IllegalArgumentException(message);
		}
	}
}
Previously we said ClassPathXmlApplicationContext and FileSystemXmlApplicationContext are very similar. So we build another class AbstractApplicationContext to place the same code for them two.
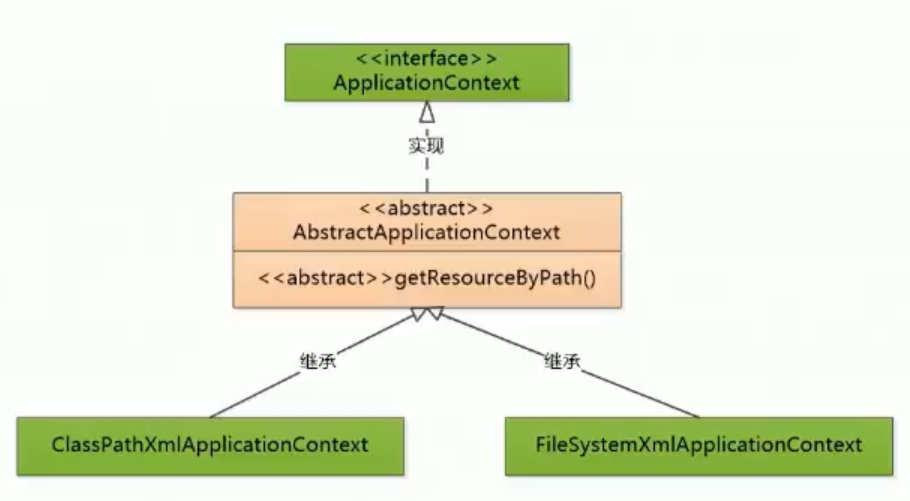
Now feel confused,huh :) Below is the framework for it:
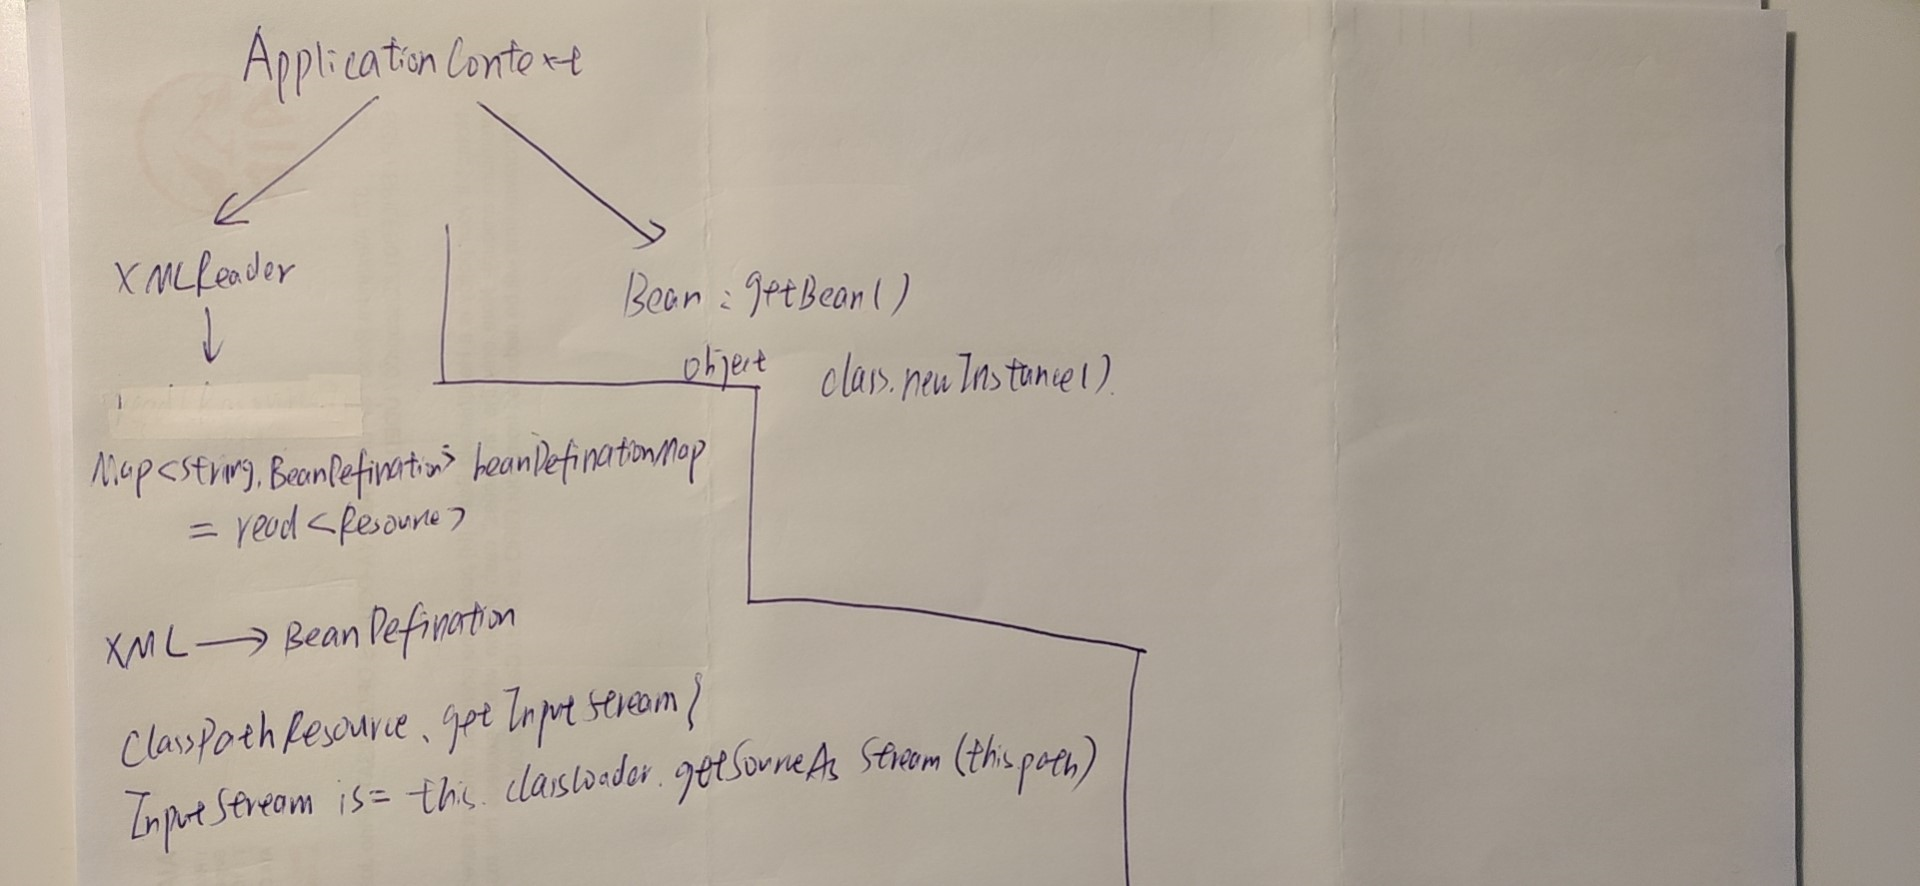
ApplicationContext contains XMLReader and Bean, functions of XMLReader is reading from Resource then return Map<String, BeanDefination>, simply saying, is transfer XML to BeanDefination. Why in this step we need ClassLoader? Because in ClassPathResource implement Resource, I use
InputStream is = this.classLoader.getResourceAsStream(this.path);
to get inputStream.
XMLReader part only create BeanDefinaionMap. Then I need to use method getBean() from ApplicationContext extends BeanFactory to generate bean. Core code of getBean() is:
			Class<?> clz = cl.loadClass(beanClassName);
			return clz.newInstance();
So now not confused :)