参考:https://blog.csdn.net/m4330187/article/details/108091447
https://blog.csdn.net/Abysscarry/article/details/80557347
https://www.cnblogs.com/54chensongxia/p/13815761.html
Redis 事务相关:https://www.jianshu.com/p/c9f5718e58f0
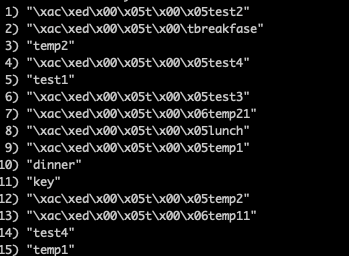
今天在自己做本机部署 redis 测试的时候,发现下面的问题:在拿取键的时候,其值有一个前缀,类似\xac\xed\x00\x05t\x00

那么这种是如何出现的呢?参照这一篇 blog 的内容,可以发现其原因是:
在spring 项目之中使用redis,我们需要在maven 之中引入
spring-data-redis。但是这个里面的*RedisTemplate<K, V>模板类*, 在序列化的时候默认是使用 JdkSerializationRedisSerializer。 但是如果我们使用 jedis 作为 redis 的客户端,jedis 在交互的时候是使用 byte 类型,而我们再看,上面引入的类型,RedisTemplate 之中的 V 是一个泛型,而不是一个 byte 类型。这就造成了默认情况下,使用 JdkSerializationRedisSerializer 来进行序列化操作,那么就会出现乱码。
文中的三种解决办法:
- 直接在定义 redisTemplate 的时候就将泛型定义成
RedisTemplate<String, String>,这样就会使用StringRedisSerializer()。 - 在 redisConfig 里面,指定生成 redisTemplate 的时候的序列化方式:
@Configuration
public class RedisConfig {

    @Bean(name = "redisTemplate")
    public RedisTemplate<Object, Object> redisTemplate(RedisConnectionFactory factory) {
        RedisTemplate<Object, Object> template = new RedisTemplate<>();
        RedisSerializer<String> redisSerializer = new StringRedisSerializer();

        template.setConnectionFactory(factory);
        //key序列化方式
        template.setKeySerializer(redisSerializer);
        //value序列化
        template.setValueSerializer(redisSerializer);
        //value hashmap序列化
        template.setHashValueSerializer(redisSerializer);
        //key haspmap序列化
        template.setHashKeySerializer(redisSerializer);

        return template;
    }
- 直接定义的时候就用 StringRedisTemplate 类,而不是 RedisTemplate。
个人补充, jedis 和 lettuce 对比
当然还有我个人补充的点:
在maven 之中,我们还可以使用官方的spring-boot-starter-data-redis。在这个之中,是将 jedis 替换成了 lettuce 作为 redis 的客户端。
可以从这里得知:
https://www.cnblogs.com/54chensongxia/p/13815761.html
Jedis
比较老牌,对于Redis 的命令支持比较全面,但是其
- 使用阻塞的 IO,同步的调用方法在程序流等到 socket 执行完 I/O 才能执行,不支持异步
- 其本地会有线程不安全的问题,所以要使用连接池
lettuce
其底层基于 Netty,也支持高级 Redis 特性,其优点是:
- 支持同步异步通信模式
- Lettuce 的API 是线程安全的,在不是执行阻塞和事务操作的情况下,多个线程可以共享一个连接
在我们使用spring-boot-starter-data-redis的情况下,只是需要在 application.yml 里面加上相应的配置,连 RedisConfig 都不需要。这个也是我之前遇到的问题所在,在 redisConfig 之中使用@Bean 产生相关的 redisTemplate 之后使用的却是默认的,所以在用spring-boot-starter-data-redis之后,其启动的时候实际上就会产生各种各样的 redisTemplate 来供程序员使用。
一个小技巧:
查看运行环境中所有的spring bean
springboot有提供现成的方式,利用actuator功能,http://localhost:8080/actuator/beans即可查看所有beans
Redis 客户端通信协议
Redis制定了RESP(Redis Serialization Protocol,Redis序列化协议)实现客户端与服务端的正常交互,这种协议简单高效,既能够被机器解析,又容易被人类识别。
RESP可以序列化不同的数据类型,如整型、字符串、数组还有一种特殊的Error类型。需要执行的Redis命令会封装为类似于字符串数组的请求然后通过Redis客户端发送到Redis服务端。Redis服务端会基于特定的命令类型选择对应的一种数据类型进行回复。
1. RESP 发送命令格式
在RESP中,发送的数据类型取决于数据报的第一个字节:
- 单行字符串的第一个字节为
+。 - 错误消息的第一个字节为
-。 - 整型数字的第一个字节为
:。 - 定长字符串的第一个字节为
$。 RESP数组的第一个字节为*。
| 数据类型 | 本文翻译名称 | 基本特征 | 例子 |
|---|---|---|---|
Simple String |
单行字符串 | 第一个字节是+,最后两个字节是\r\n,其他字节是字符串内容 |
+OK\r\n |
Error |
错误消息 | 第一个字节是-,最后两个字节是\r\n,其他字节是异常消息的文本内容 |
-ERR\r\n |
Integer |
整型数字 | 第一个字节是:,最后两个字节是\r\n,其他字节是数字的文本内容 |
:100\r\n |
Bulk String |
定长字符串 | 第一个字节是$,紧接着的字节是内容字符串长度\r\n,最后两个字节是\r\n,其他字节是字符串内容 |
$4\r\ndoge\r\n |
Array |
RESP数组 |
第一个字节是*,紧接着的字节是元素个数\r\n,最后两个字节是\r\n,其他字节是各个元素的内容,每个元素可以是任意一种数据类型 |
*2\r\n:100\r\n$4\r\ndoge\r\n |
发送的命令格式如下,CRLF代表”\r\n”:
*<参数数量> CRLF
$<参数1的字节数量> CRLF
<参数1> CRLF
...
$<参数N的字节数量> CRLF
<参数N> CRLF
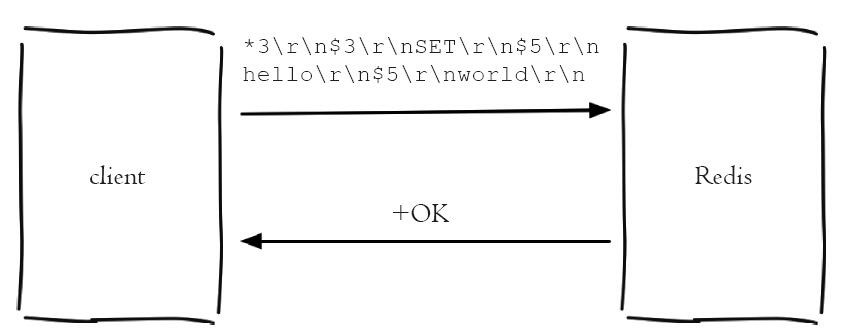
以set hello world这个命令为例,发送的内容就是这样的:
*3
$3
SET
$5
hello
$5
world
第一行*3表示有3个参数,3表示接下来的一个参数有3个字节,接下来是参数,3表示接下来的一个参数有3个字节,接下来是参数,5表示下一个参数有5个字节,接下来是参数,$5表示下一个参数有5个字节,接下来是参数。
所以set hello world最终发送给redis服务器的命令是:
*3\r\n$3\r\nSET\r\n$5\r\nhello\r\n$5\r\nworld\r\n
2. RESP 响应内容
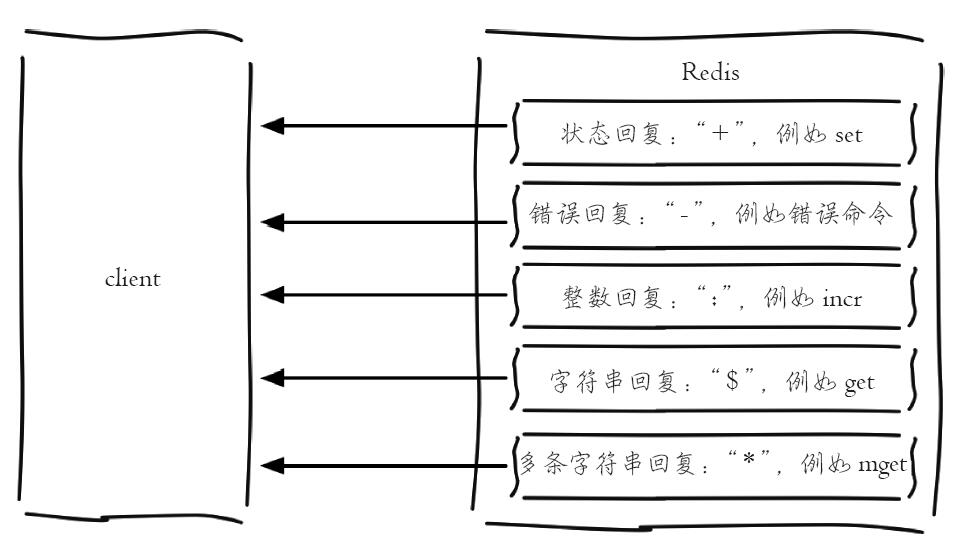
Redis的返回结果类型分为以下五种:
        正确回复:在RESP中第一个字节为"+"
        错误回复:在RESP中第一个字节为"-"
        整数回复:在RESP中第一个字节为":"
        字符串回复:在RESP中第一个字节为"$"
        多条字符串回复:在RESP中第一个字节为"*"

(+) 表示一个正确的状态信息,具体信息是当前行+后面的字符。
(-)  表示一个错误信息,具体信息是当前行-后面的字符。
(*) 表示消息体总共有多少行,不包括当前行,*后面是具体的行数。
($) 表示下一行数据长度,不包括换行符长度\r\n,$后面则是对应的长度的数据。
(:) 表示返回一个数值,:后面是相应的数字节符。
附上 redis 事务全文:
首先从使用springboot+redis碰到的一个问题说起。在前几篇文章中介绍了用SpringBoot+redis构建了一个个人博客。在刚开始远行的时候发现发了几个请求操作了几次redis之后,后面的就被阻塞了,请求一直在等待返回,我们重现一下问题。
[注意] 该问题只会出现在springboot 2.0之前的版本;2.0之后springboot连接Redis改成了lettuce,并重新实现,问题已经不存在打开Template的事务支持
POM配置:<?xml version="1.0" encoding="UTF-8"?> <project xmlns="http://maven.apache.org/POM/4.0.0" xmlns:xsi="http://www.w3.org/2001/XMLSchema-instance" xsi:schemaLocation="http://maven.apache.org/POM/4.0.0 http://maven.apache.org/xsd/maven-4.0.0.xsd"> <modelVersion>4.0.0</modelVersion> <groupId>com.github.springboot</groupId> <artifactId>redis-tx-demo</artifactId> <version>0.0.1-SNAPSHOT</version> <packaging>jar</packaging> <name>SpringBoot redis TX demo</name> <description>Demo project for Spring Boot with Redis transaction</description> <parent> <groupId>org.springframework.boot</groupId> <artifactId>spring-boot-starter-parent</artifactId> <version>1.5.2.RELEASE</version> <relativePath/> <!-- lookup parent from repository --> </parent> <properties> <project.build.sourceEncoding>UTF-8</project.build.sourceEncoding> <project.reporting.outputEncoding>UTF-8</project.reporting.outputEncoding> <java.version>1.8</java.version> </properties> <dependencies> <dependency> <groupId>org.springframework.boot</groupId> <artifactId>spring-boot-starter-data-redis</artifactId> </dependency> <dependency> <groupId>org.springframework.boot</groupId> <artifactId>spring-boot-starter-data-rest</artifactId> </dependency> <dependency> <groupId>org.springframework.boot</groupId> <artifactId>spring-boot-starter-test</artifactId> <scope>test</scope> </dependency> </dependencies> <build> <plugins> <plugin> <groupId>org.springframework.boot</groupId> <artifactId>spring-boot-maven-plugin</artifactId> </plugin> </plugins> </build> </project>Redis configuration (
EnbaleTransactionSupport设为true):@Configuration public class RedisConfiguration { @Bean public StringRedisTemplate redisTemplate(RedisConnectionFactory redisConnectionFactory) { StringRedisTemplate template = new StringRedisTemplate(); template.setConnectionFactory(redisConnectionFactory); template.setEnableTransactionSupport(true); //打开事务支持 return template; } }Controller就是简单的set一个key到redis:
@RestController
public class DemoController {

    private StringRedisTemplate template;

    public DemoController(StringRedisTemplate template) {
        this.template = template;
    }

    @GetMapping("/put")
    public String redisSet() {
        int i = (int)(Math.random() * 100);
        template.opsForValue().set("key"+i, "value"+i, 300, TimeUnit.SECONDS);
        return "success "+"key"+i;
    }

}
启动后,我们使用RestClient发送请求http://localhost:8080/put,发送8次之后就会发现没有返回了。这个时候我们查看redis的链接数,发现已经超过8个,springboot对于jedis连接池默认的最大活跃连接数是8,所以看出来是连接池被耗光了。
127.0.0.1:6379> info clients
# Clients
connected_clients:9
client_longest_output_list:0
client_biggest_input_buf:0
blocked_clients:0
127.0.0.1:6379>
还有查看程序的日志可以发现,
RedisConnectionUtils只有Opening RedisConnection而没有close。2018-08-11 11:00:48.889 [DEBUG][http-nio-8080-exec-8]:o.s.data.redis.core.RedisConnectionUtils [doGetConnection:126] Opening RedisConnection 2018-08-11 11:00:50.169 [DEBUG][http-nio-8080-exec-8]:o.s.w.s.m.m.a.RequestResponseBodyMethodProcessor [writeWithMessageConverters:249] Written [success key39] as "text/plain" using [org.springframework.http.converter.StringHttpMessageConverter@766a49c7] 2018-08-11 11:00:50.170 [DEBUG][http-nio-8080-exec-8]:org.springframework.web.servlet.DispatcherServlet [processDispatchResult:1044] Null ModelAndView returned to DispatcherServlet with name 'dispatcherServlet': assuming HandlerAdapter completed request handling 2018-08-11 11:00:50.170 [DEBUG][http-nio-8080-exec-8]:org.springframework.web.servlet.DispatcherServlet [processRequest:1000] Successfully completed request 2018-08-11 11:00:50.170 [DEBUG][http-nio-8080-exec-8]:o.s.boot.web.filter.OrderedRequestContextFilter [doFilterInternal:104] Cleared thread-bound request context: org.apache.catalina.connector.RequestFacade@c03b2d8 2018-08-11 11:00:53.854 [DEBUG][http-nio-8080-exec-9]:o.s.boot.web.filter.OrderedRequestContextFilter [initContextHolders:114] Bound request context to thread: org.apache.catalina.connector.RequestFacade@c03b2d8 2018-08-11 11:00:53.856 [DEBUG][http-nio-8080-exec-9]:org.springframework.web.servlet.DispatcherServlet [doService:865] DispatcherServlet with name 'dispatcherServlet' processing GET request for [/put] 2018-08-11 11:00:53.857 [DEBUG][http-nio-8080-exec-9]:o.s.w.s.m.m.a.RequestMappingHandlerMapping [getHandlerInternal:310] Looking up handler method for path /put 2018-08-11 11:00:53.857 [DEBUG][http-nio-8080-exec-9]:o.s.w.s.m.m.a.RequestMappingHandlerMapping [getHandlerInternal:317] Returning handler method [public java.lang.String com.github.springboot.demo.DemoController.redisSet()] 2018-08-11 11:00:53.858 [DEBUG][http-nio-8080-exec-9]:o.s.b.factory.support.DefaultListableBeanFactory [doGetBean:251] Returning cached instance of singleton bean 'demoController' 2018-08-11 11:00:53.858 [DEBUG][http-nio-8080-exec-9]:org.springframework.web.servlet.DispatcherServlet [doDispatch:951] Last-Modified value for [/put] is: -1 2018-08-11 11:00:53.861 [DEBUG][http-nio-8080-exec-9]:o.s.data.redis.core.RedisConnectionUtils [doGetConnection:126] Opening RedisConnection关闭template的事务支持
接下来我们修改一下
RedisConfiguration的配置,不启用事务管理,@Bean public StringRedisTemplate redisTemplate(RedisConnectionFactory redisConnectionFactory) { StringRedisTemplate template = new StringRedisTemplate(); template.setConnectionFactory(redisConnectionFactory); // template.setEnableTransactionSupport(true); //禁用事务支持 return template; }重新测试一下,发现是正常的,redis的client链接数一直保持在2。程序日志里的也可以看到
Redis Connection关闭的日志。2018-08-11 15:55:19.975 [DEBUG][http-nio-8080-exec-1]:o.s.data.redis.core.RedisConnectionUtils [doGetConnection:126] Opening RedisConnection 2018-08-11 15:55:20.029 [DEBUG][http-nio-8080-exec-1]:o.s.data.redis.core.RedisConnectionUtils [releaseConnection:210] Closing Redis Connection 2018-08-11 15:55:20.056 [DEBUG][http-nio-8080-exec-1]:o.s.w.s.m.m.a.RequestResponseBodyMethodProcessor [writeWithMessageConverters:249] Written [success key72] as "text/plain" using [org.springframework.http.converter.StringHttpMessageConverter@51ab1ee3]也就是说,如果我们把事务的支持打开,spring在每次操作之后是不会主动关闭连接的。我们去
RedisTemplate的源码中找下原因。public ValueOperations<K, V> opsForValue() { if (valueOps == null) { valueOps = new DefaultValueOperations<K, V>(this); } return valueOps; }可以发现
template.opsForValue().set()操作最终是调用的DefaultValueOperations中的set()方法,继续跟进去最终调用的RedisTemplate中的execute(RedisCallback<T> action, boolean exposeConnection, boolean pipeline)方法。public <T> T execute(RedisCallback<T> action, boolean exposeConnection, boolean pipeline) { Assert.isTrue(initialized, "template not initialized; call afterPropertiesSet() before using it"); Assert.notNull(action, "Callback object must not be null"); RedisConnectionFactory factory = getConnectionFactory(); RedisConnection conn = null; try { if (enableTransactionSupport) { // only bind resources in case of potential transaction synchronization conn = RedisConnectionUtils.bindConnection(factory, enableTransactionSupport); } else { conn = RedisConnectionUtils.getConnection(factory); } boolean existingConnection = TransactionSynchronizationManager.hasResource(factory); RedisConnection connToUse = preProcessConnection(conn, existingConnection); boolean pipelineStatus = connToUse.isPipelined(); if (pipeline && !pipelineStatus) { connToUse.openPipeline(); } RedisConnection connToExpose = (exposeConnection ? connToUse : createRedisConnectionProxy(connToUse)); T result = action.doInRedis(connToExpose); // close pipeline if (pipeline && !pipelineStatus) { connToUse.closePipeline(); } // TODO: any other connection processing? return postProcessResult(result, connToUse, existingConnection); } finally { RedisConnectionUtils.releaseConnection(conn, factory); } }可以看到获取连接的操作也针对打开事务支持的template有特殊的处理逻辑。这里我们先跳过,先看看最终肯定会走到的
RedisConnectionUtils.releaseConnection(conn, factory)这一步。/** * Closes the given connection, created via the given factory if not managed externally (i.e. not bound to the * thread). * * @param conn the Redis connection to close * @param factory the Redis factory that the connection was created with */ public static void releaseConnection(RedisConnection conn, RedisConnectionFactory factory) { if (conn == null) { return; } RedisConnectionHolder connHolder = (RedisConnectionHolder) TransactionSynchronizationManager.getResource(factory); if (connHolder != null && connHolder.isTransactionSyncronisationActive()) { if (log.isDebugEnabled()) { log.debug("Redis Connection will be closed when transaction finished."); } return; } // release transactional/read-only and non-transactional/non-bound connections. // transactional connections for read-only transactions get no synchronizer registered if (isConnectionTransactional(conn, factory) && TransactionSynchronizationManager.isCurrentTransactionReadOnly()) { unbindConnection(factory); } else if (!isConnectionTransactional(conn, factory)) { if (log.isDebugEnabled()) { log.debug("Closing Redis Connection"); } conn.close(); } }可以看到针对打开事务支持的template,只是解绑了连接,根本没有做
close的操作。关于什么是解绑,其实这个方法的注释中已经说的比较清楚了,对于开启了事务的Template,由于已经绑定了线程中连接,所以这里是不会关闭的,只是做了解绑的操作。 到这里原因就很清楚了,就是只要template开启了事务支持,spring就认为只要使用这个template就会包含在事务当中,因为一个事务中的操作必须在同一个连接中完成,所以在每次get/set之后,template是不会关闭链接的,因为它不知道事务有没有结束。使用@Transanctional注解支持Redis事务
既然
RedisTemlate在setEnableTransactionSupport会造成连接不关闭,那怎么样才能正常关闭呢?我们将事务支持开关和@Transanctional结合起来用看看会怎么样。 spring中要使用@Transanctional首先要配transactionManager,但是spring没有专门针对Redis的事务管理器实现,而是所有调用RedisTemplate的方法最终都会调用到RedisConnctionUtils这个类的方法上面,在这个类里面会判断是不是进入到事务里面,也就是说Redis的事务管理的功能是由RedisConnctionUtils内部实现的。 根据官方文档,我只想用Redis事务,也必须把JDBC捎上。当然反过来讲,不依赖数据的项目确实不多,貌似这么实现影响也不大。下面我们先根据官方文档配置一下看看效果。 首先修改POM配置,添加两个依赖。如果项目里本来已经使用了数据库,那这一步就不需要了。<dependency> <groupId>org.springframework.boot</groupId> <artifactId>spring-boot-starter-jdbc</artifactId> </dependency> <dependency> <groupId>com.h2database</groupId> <artifactId>h2</artifactId> <scope>runtime</scope> </dependency>然后修改
RedisConfiguration@Bean public StringRedisTemplate redisTemplate(RedisConnectionFactory redisConnectionFactory) { StringRedisTemplate template = new StringRedisTemplate(); template.setConnectionFactory(redisConnectionFactory); template.setEnableTransactionSupport(true);//打开事务支持 return template; } //配置事务管理器 @Bean public PlatformTransactionManager transactionManager(DataSource dataSource) throws SQLException { return new DataSourceTransactionManager(dataSource); }我们新建一个
RedisService,将原来的数据操作移到service里面。同时将Service方法加上@Transactional注解。@Service public class RedisService { private StringRedisTemplate template; public RedisService(StringRedisTemplate template) { this.template = template; } @Transactional public String put() { int i = (int)(Math.random() * 100); template.opsForValue().set("key"+i, "value"+i, 300, TimeUnit.SECONDS); return "success "+"key"+i; } } //----------------------------------------------------------- //controller里面加一个新的方法,调用Service @GetMapping("/puttx") public String redisTxSet() { return redisService.put(); }完成这些工作之后,再往http://localhost:8080/puttx发送请求,无论点多少次,Redis的连接数始终维持在1个不变。在看程序的输出日志里面我们也发现了,事务结束后连接被正常释放。因为使用了JDBC的事务管理器,所以还顺便做了一次数据库事务的开启和提交。还有一点值得注意的是,跟数据库一样,使用注解来做事务管理,spring也会主动管理redis事务的提交和回滚,也就是在之前发送一条MULTI命令,成功后发送EXEC,失败后发送DISCARD。
2018-08-11 20:57:04.990 [DEBUG][http-nio-8080-exec-1]:o.s.data.redis.core.RedisConnectionUtils [doGetConnection:126] Opening RedisConnection
2018-08-11 20:57:04.990 [DEBUG][http-nio-8080-exec-1]:o.springframework.aop.framework.JdkDynamicAopProxy [getProxy:118] Creating JDK dynamic proxy: target source is SingletonTargetSource for target object [org.springframework.data.redis.connection.jedis.JedisConnection@20f2be3c]
2018-08-11 20:57:04.990 [DEBUG][http-nio-8080-exec-1]:o.s.data.redis.core.RedisConnectionUtils [intercept:337] Invoke 'multi' on bound conneciton
2018-08-11 20:57:04.991 [DEBUG][http-nio-8080-exec-1]:o.s.data.redis.core.RedisConnectionUtils [intercept:337] Invoke 'isPipelined' on bound conneciton
2018-08-11 20:57:04.991 [DEBUG][http-nio-8080-exec-1]:o.s.data.redis.core.RedisConnectionUtils [intercept:337] Invoke 'setEx' on bound conneciton
2018-08-11 20:57:04.991 [DEBUG][http-nio-8080-exec-1]:o.s.data.redis.core.RedisConnectionUtils [releaseConnection:198] Redis Connection will be closed when transaction finished.
2018-08-11 20:57:04.991 [DEBUG][http-nio-8080-exec-1]:o.s.jdbc.datasource.DataSourceTransactionManager [processCommit:759] Initiating transaction commit
2018-08-11 20:57:04.991 [DEBUG][http-nio-8080-exec-1]:o.s.jdbc.datasource.DataSourceTransactionManager [doCommit:310] Committing JDBC transaction on Connection [ProxyConnection[PooledConnection[conn9: url=jdbc:h2:mem:testdb user=SA]]]
2018-08-11 20:57:04.992 [DEBUG][http-nio-8080-exec-1]:o.s.data.redis.core.RedisConnectionUtils [intercept:337] Invoke 'exec' on bound conneciton
2018-08-11 20:57:04.992 [DEBUG][http-nio-8080-exec-1]:o.s.data.redis.core.RedisConnectionUtils [afterCompletion:306] Closing bound connection after transaction completed with 0
2018-08-11 20:57:04.992 [DEBUG][http-nio-8080-exec-1]:o.s.data.redis.core.RedisConnectionUtils [intercept:337] Invoke 'close' on bound conneciton
2018-08-11 20:57:04.993 [DEBUG][http-nio-8080-exec-1]:o.s.jdbc.datasource.DataSourceTransactionManager [doCleanupAfterCompletion:368] Releasing JDBC Connection [ProxyConnection[PooledConnection[conn9: url=jdbc:h2:mem:testdb user=SA]]] after transaction
2018-08-11 20:57:04.993 [DEBUG][http-nio-8080-exec-1]:o.springframework.jdbc.datasource.DataSourceUtils [doReleaseConnection:327] Returning JDBC Connection to DataSource
总结
在spring中要使用Redis注解式事务,首先要设置
RedisTemplate的enableTransactionSupport属性为true,然后配置一个jdbc的事务管理器。 这里有一点非常重要,一旦这样配置,所有使用这个template的redis操作都必须走注解式事务,要不然会导致连接一直占用,不关闭。建议
- 升级到springboot 2.0以上版本,如果因为项目原因无法升级看下面的建议
- 如果使用Redis事务的场景不多,完全可以自己管理,不需要使用spring的注解式事务。如下面这样使用:
List<Object> txResults = redisTemplate.execute(new SessionCallback<List<Object>>() {
  public List<Object> execute(RedisOperations operations) throws DataAccessException {
    operations.multi();
    operations.opsForSet().add("key", "value1");
    // This will contain the results of all ops in the transaction
    return operations.exec();
  }
});
- 如果一定要使用spring提供的注解式事务,建议初始化两个
RedisTemplateBean,分别设置enableTransactionSupport属性为true和false。针对需要事务和不需要事务的操作使用不同的template。- 从个人角度,我不建议使用redis事务,因为redis对于事务的支持并不是关系型数据库那样满足ACID。Redis事务只能保证ACID中的隔离性和一致性,无法保证原子性和持久性。而我们使用事务最重要的一个理由就是原子性,这一点无法保证,事务的意义就去掉一大半了。所以事务的场景可以尝试通过业务代码来实现。
本篇博客使用的代码:https://github.com/chilexun/springboot-demo.git
作者:空挡 链接:https://www.jianshu.com/p/c9f5718e58f0 来源:简书 著作权归作者所有。商业转载请联系作者获得授权,非商业转载请注明出处。


